Bear Pancakes (makes 6-7 pancakes)
Pancakes:
2 medium eggs, room temperature
40g (1 2/5 oz.) sugar
150 mL (2/3 cup) milk, room temperature
2 tbsp. salad oil
Salt
200g (7 oz.) pastry flour
2 tsp. baking powder
1. Crack eggs into bowl & beat. Mix in sugar.
2. Mix in half of milk.
3. Add salad oil & salt; mix well.
4. Sift in flour & baking powder, stirring until no powder remains.
5. Transfer 2-3 tbsp. to piping bag. Seal shut w/ rubber band.
6. Mix remaining milk into rest of dough.
7. Cut tip of piping bag w/ scissors. Draw bears face onto frying pan.
8. Heat frying pan over medium heat. Momentarily remove from heat when edges are browned & place on top of damp cloth.
9. Pour ladle of pancake batter over top.
10. Pour 2 small spoonfuls on top of main pancake for ears.
11. Cover & cook over medium-low heat.
12. One surface is bubbly, flip pancake. Cover again & cook 30-60 more seconds.
13. Transfer pancakes to platter & cover w/ damp cloth so they won’t dry out. Fry remaining pancakes.
14. For the decorated pancake, skip the face part & simply cook the bear’s head.
Whipped butter:
100g (3 1/2 oz.) salted butter, room temperature
50 mL (1/5 cup) milk, room temperature
15. Knead butter until soft. Beat w/ hand mixer.
16. Add milk a little at a time & mix w/ hand mixer.
17. Add dollop onto decorative pancake w/ 2 small spoons to create muzzle. Round out.
Decoration:
Chocolate icing pen
Pink icing pen
Strawberries
Honey
18. Warm icing pens & cut off tips. Draw eyes in brown, nose in pink. Transfer whipped butter into piping bag w/ star tip. Add a dollop by bear’s ear.
19. Transfer stack of pancakes to serving plate, topping w/ decorative cake. Decorate w/ strawberries. Pour honey over top.
Cat Macarons (makes about 15 macarons)
Macarons:
1 egg white (about 35g / 1¼ oz.)
30g (1 oz.) granulated sugar
Red & blue food coloring gel (or liquid/powdered coloring for a paler purple)
40g (1 2/5 oz.) almond paste
40g (1 2/5 oz.) powdered sugar
(if short on time, you can substitute store-bought macarons)
1. Whip egg white in bowl until slight peaks form. Add sugar & whip until fluffy w/ medium peaks.
2. Mix in food coloring until desired color is achieved.
3. Push through sieve w/ rubber spatula.
4. Mix in almond paste & powdered sugar. Batter should be smooth & glossy; should rise & form ribbons when dripping off spatula. Be careful not to overmix.
5. Spoon into piping bag w/ round tip. Pipe 3 cm circles onto baking sheet.
6. Let dry 1 hour, or until surface doesn’t stick to hands when touched.
7. Bake at 170C (338F) about 2 minutes. Crack open oven door for about 10 seconds, then reduce temperature to 130C (266F) & bake 15-18 minutes. Cool on baking sheet.
Filling & toppings:
40g (1 2/5 oz.) unsalted butter
50g powdered sugar
40g (1 2/5 oz.) cream cheese
Red food coloring gel
Raspberry jam
Pale purple icing pen
8. Beat butter & sugar in bowl until fluffy. Beat in cream cheese until smooth.
9. Separate a bit of filling from the rest. Mix food coloring into larger portion until desired color is achieved.
10. Spoon colored filling into piping bag w/ star tip.
11. Pair macarons that are similarly sized.
12. Spread a bit of raspberry jam onto half of macarons. Pipe filling over top. Top w/ other half of macarons & freeze for half a day.
13. Spoon uncolored cream into piping bag w/ star tip. Pipe on ears & forehead decoration.
14. Warm icing pen in warm water. Cut off tip & pipe on eyes, nose, whiskers, & tail.
Chick Cake Pops (makes about 10 pops)
Sponge cake:
2 medium eggs, room temperature
60g (2.1 oz) sugar
2 tsp. milk, room temperature
60g (2.1 oz) pastry flour
20g (7/10 oz.) melted butter
80-100g (2.8 - 3 1/2 oz.) cream cheese, room temperature
(if short on time, you can substitute store-bought sponge cake or castella cake)
1. Gently mix eggs & sugar in bowl w/ electric hand mixer.
2. Heat water in frying pan to about 50C (122F), or until simmering. Hold bowl above pan to form double boiler. Continue to mix until batter is about 36C (97F), then remove from heat.
3. Mix w/ hand mixer until slow ribbons form when whisk is lifted.
4. Beat in milk well. Sift in half of flour, mixing in w/ rubber spatula until no powder remains before adding next portion.
5. Sift in remaining flour & fold in from bottom w/ rubber spatula.
6. Mix in butter from bottom w/ rubber spatula.
7. Carefully pour into parchment-lined baking sheet. Carefully drop from 10-20 cm height to get rid of air bubbles.
8. Bake at 170C (338F) for 20-25 minutes. Center should spring back when pressed. Remove from edges of paper & set on wire rack to cool.
9. Weigh out about 100g of cake & place in a properly sized bowl. Break into fine pieces w/ hands.
10. Add cream cheese & mix w/ hands until everything comes together.
11. Form into 10 balls w/ hands.
Decoration:
100-150g (3 1/2 - 5 1/3 oz.) white coating chocolate
about 50g (1 3/4 oz.) lemon coating chocolate
Chocolate icing pen
Yellow icing pen
Sanding sugar
12. Melt each coating chocolate separately over double boiler.
13. Place a stick into each cake pop. Place on parchment-lined baking sheet & refrigerate at least 10 minutes.
14. Dip each cake pop twice into white chocolate, spinning to coat evenly. Once whole ball is coated & excess is shaken off, dry by piercing sticks into styrofoam block.
15. Let harden.
16. Dip upper halves of pops twice into lemon coating, shaking off excess. Stick into styrofoam again & let harden.
17. Once completely hardened, warm chocolate pens in hot water & cut off tips. Draw brown eyes, plus yellow wings & beak onto each chick.
Dog Chocolate (makes 1)
Brownie (1, 18 x 18 cm):
100g (3 1/2 oz.) unsalted butter, cut into 1 cm pieces
80g (2 4/5 oz.) chocolate bar, finely chopped
80g (2 4/5 oz.) sugar, sifted
2 eggs, room temperature
50g (1 3/4 oz.) pastry flour
30g (1 oz.) cocoa powder
1 tsp. baking powder
(if short on time, you can substitute store-bought brownies)
1. Place butter & chocolate bar in bowl. Place over double boiler.
2. Stir until melted. Mix in sugar.
3. Mix in eggs one at a time.
4. Sift in flour, cocoa, & baking powder; fold w/ rubber spatula until smooth.
5. Pour into parchment-lined baking dish. Bake at 170C (338F) for 20-30 minutes, or until bamboo skewer inserted into center comes out clean.
6. Remove from baking dish & cool on parchment paper.
Toppings:
1 chocolate bar
1 chocolate icing pen
1 strawberry
Heavy cream
Sugar
2 almonds
7. Once cool, remove brownie from paper & cut into six squares. Cut one square in half. Cut two into triangles. Construct pieces into house. Trim chocolate bar to fit onto roof.
8. Warm icing , cut off tip, & use as glue to affix brownie pieces together & chocolate bar pieces to roof.
9. Whip cream & sugar in bowl in ice water until soft peaks form.
10. Spoon into 2 piping bags, 1 w/ star tip, the other w/ round tip.
11. Pipe tail onto back of house w/ star tip. Place strawberry point upwards on opposite side. Pipe round muzzle onto front of strawberry.
12. Pipe eyes & nose onto head w/ icing. Cut almonds in half on bias & glue ears onto strawberry w/ icing.
Dolphin Gelatin (makes 2 [150 mL] servings)
Milk gelatin:
2g powdered agar
25g sugar
150 mL water
150 mL milk, room temperature
1. Mix agar, sugar, & water in pot w/ rubber spatula.
2. Bring to boil over medium heat. Reduce heat to low & simmer, mixing w/ rubber spatula, until powder is dissolved, 1-2 minutes.
3. Mix in milk & quickly transfer to wet baking dish. Refrigerate about 1 hour to firm up.
4. Cut out dolphins or whatever other shape you’d like w/ cookie cutters. Line on baking sheet. Refrigerate again.
Sea gelatin:
10g gelatin powder
60 mL water
280 mL carbonated water
3 tbsp. sugar
40 mL blue snowcone syrup
5. Pour water into heat-resistant container. Sift in gelatin powder & soak. Heat over double boiler until dissolved.
6. Mix carbonated water, sugar, & syrup in bowl w/ spoon.
7. Add 1-2 tbsp. syrup mixture to gelatin mixture to water down, then add gelatin mixture to bowl & mix w/ rubber spatula.
8. Place in bowl of ice water & skim foam from surface of mixture. Mix w/ rubber spatula until thick.
9. Scoop mixture into molds ¾ full. Carefully place milk dolphins in center w/ chopsticks and let sink to middle.
10. Refrigerate at least 2 hours.
11. Soak molds in warm water (about 50C / 122F).
12. Hold single serving plate to open end of mold w/ both hands. Carefully flip over & remove mold.
Decoration:
50 mL heavy cream
1 tsp. sugar
13. Whip cream & sugar in bowl atop ice water until soft peaks form.
14. Transfer to piping bag w/ star tip. Pipe around bottom edge & on top of gelatin.
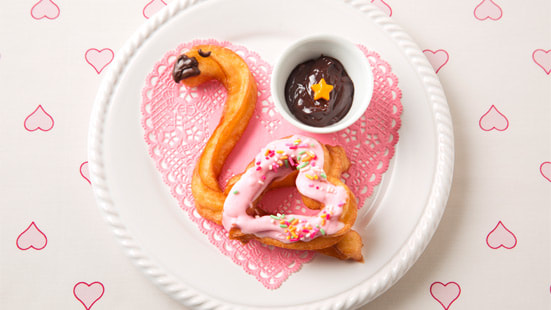
Flamingo Churros (makes 6-8 churros)
Churros:
150 mL water
15g unsalted butter, room temperature, cut into 1 cm pieces
30g sugar
¼ tsp. salt
120g pastry flour, sifted
1-2 medium eggs, beaten, room temperature
Frying oil
1. Place water, butter, salt, & sugar in pot over medium heat.
2. Bring to boil. When butter is melted, add flour all at once & turn off heat. Mix w/ rubber spatula until dough comes together.
3. Transfer to bowl & mix in a little egg at a time w/ rubber spatula.
4. Transfer to piping bag w/ large star tip. Pipe onto parchment-lined baking sheet w/ flamingo & heart templates drawn on top. (Templates available on Toei or TV Asahi website.)
5. Heat oil in frying pan to 170C (338F). Carefully pick up parchment & transfer to flamingo to oil. Fry until light brown, then remove from heat & cool.
Decoration:
50g strawberry coating chocolate, finely chopped
Sprinkles
Chocolate icing pen
6. Melt coating chocolate over double boiler.
7. Dip 1 side of each heart into chocolate twice. Add sprinkles, then let harden.
8. Warm chocolate pen & cut off tip. Draw on flamingo’s eye & beak. Overlap each flamingo w/ heart.
Chocolate dip:
50g chocolate bar, broken into pieces
2 tbsp. milk
Heat both in bowl over double boiler until melted. Transfer to small container & serve on side of churros.
Giraffe Millecrepe (makes 1 [20 cm] cake)
Crepes:
3 medium eggs
450 mL (1.9 cups) milk
25g (9/10 oz.) melted butter
150g (5 1/3 oz.) pastry flour
1½ tbsp. sugar
¼ tsp. salt
1. Crack eggs into bowl & beat. Mix in milk.
2. Mix in butter.
3. In separate bowl, roughly mix flour, sugar, & salt.
4. Mix a bit of wet mixture into dry mixture.
5. Sift remaining dry mixture into wet mixture. Wrap bowl in plastic wrap & refrigerate at least 30 minutes, up to overnight (around 3 hours is ideal).
6. Heat 20 cm frying pan over medium heat, then reduce to low heat. Pour in 1 ladle batter & quickly turn wrist to spread out across bottom of pan.
7. Once surface is dry & slightly browned, carefully rotate crepe w/ cooking chopsticks. Cook opposite side.
8. Once crepe is fully cooked, transfer to platter. Repeat until all batter is used.
9. Cover plate of crepes w/ wrung out damp cloth & chill.
Cream:
400 mL (1.7 cups) heavy cream
4 tbsp. sugar
10. Whip cream & sugar in bowl atop ice water until soft peaks form.
11. Cover cutting board w/ parchment paper & lay or crepes. Spread thin layer cream onto crepe, then top w/ another. Repeat until you reach top crepe.
12. Once all crepes have been layered, refrigerate at least 1 hour. Cover remaining cream in plastic wrap & save in refrigerator.
Coffee syrup:
1 tsp. instant coffee
1 tbsp. sugar
1 tbsp. hot water
13. Warm a knife in warm water. Cut giraffe shape from millecrepe.
14. Mix coffee & sugar in heat-resistant container. Mix in water. Brush onto ears & horns of giraffe.
Decoration:
Chocolate icing pen
Yellow icing pen
2 mint leaves
15. Warm icing pens & cut off tips. Draw on eyes w/ chocolate & nostrils w/ yellow.
16. Transfer remaining cream into piping bag w/ star tip. Pipe large dollops onto giraffe’s forehead. Garnish w/ mint leaves.
Gummy Whales
Green gummies:
50 mL (1/5 cup) orange juice
2 tbsp. blue snowcone syrup
1 tbsp. sugar
10g (1/3 oz.) gelatin powder
1. Mix juice, syrup, & sugar in pot w/ rubber spatula. Heat.
2. Once boiling, remove from heat. Add gelatin powder & mix w/ rubber spatula until dissolved.
3. Oil heart & dome-shaped gummy mold w/ fingers.
4. Once mixture is cool enough to handle, spoon into molds ¼ full. Refrigerate.
Blue gummies:
50 mL (1/5 cup) water
2 tbsp. blue snowcone syrup
1½ tbsp. sugar
10g (1/3 oz.) gelatin powder
5. Mix water, syrup, & sugar in pot w/ rubber spatula. Heat.
6. Once boiling, remove from heat. Add gelatin powder & mix w/ rubber spatula until dissolved.
7. Once mixture is cool enough to handle, spoon into chilled dome molds halfway full. Refrigerate.
8. Once all gummies have been solidifed, carefully remove from molds & line up on plate.
9. Cut tail & fins from heart shapes. Place around domes.
Decoration:
Chocolate icing pen
White icing pen
10. Warm chocolate pens in hot water & cut off tips. Draw on whale’s eyes. Top head w/ white spray.
Hamster Pumpkin Flan (makes 1 serving)
Pumpkin flan:
1 small (about palm-sized) pumpkin
2 tbsp. brown sugar
100 mL (3/5 cup) milk
1 medium egg
15g (1/2 oz.) melted butter
Vanilla oil
1. Wrap pumpkin in plastic wrap & heat in 600W microwave about 3 minutes. Remove wrap & cut off top third. Spoon out guts.
2. Wrap hollowed out pumpkin pieces in plastic wrap & again & microwave 1-2 minutes. Remove wrap & scoop out flesh into bowl, being careful not to damage skin.
3. Puree pumpkin flesh, sugar, milk, egg, & butter w/ immersion blender.
4. Beat in bowl & add vanilla. Strain through sieve back into bowl.
5. Set steaming plate or platter over water filled pot. Line w/ parchment paper. Fill hollowed out pumpkin bowl w/ flan & cook over high heat for 2 minutes, then very low heat for 20. Refrigerate, keeping inside pot.
Caramel sauce:
30g granulated sugar
1 tsp. water
1 tbsp. hot water
6. Quickly mix sugar & water in pot over medium heat, shaking & tilting pan, until sugar dissolves.
7. Once changed in color, fragrant, & smoking a little, remove from heat & add hot water.
Sweet pumpkins (makes 6-8):
¼ pumpkin (about 200g / 7 oz)
10g (1/3 oz.) unsalted butter
2 tbsp. brown sugar
Cinnamon
2 tbsp. beaten egg
2 tbsp. katakuriko (can substitute potato starch)
6-8 almonds
Chocolate icing pen
Yellow icing pen
8. Scoop out pumpkin guts w/ spoon & cut away pieces of skin w/ knife. Place pumpkin on heat-resistant plate. cover loosely w/ plastic wrap, & microwave 4 minutes.
9. Place in bowl & mash w/ whisk. Mix in butter, sugar, cinnamon, & half of egg while still hot.
10. Add starch & form into balls w/ hands. Shape into hamsters w/ hands & line up on baking sheet. Brush w/ remaining egg.
11. Add almonds to tops for ears. Bake at 200C (392F) for 8-10 minutes. Cool.
12. Warm chocolate pens in hot water & cut off tips. Pipe brown eyes & mouths onto hamsters. Pipe jack-o-lantern face onto pumpkin bowl w/ yellow
13. Place hamster on top of pumpkin flan. Finish w/ caramel sauce.
Hedgehog Fruit Tart (makes 1 [18 cm] tart)
Tart:
75g (2 2/3 oz.) unsalted butter, room temperature
50g (1 3/4 oz.) powdered sugar
1 medium egg yolk
130g (4 3/5 oz.) pastry flour, sifted
1. Knead butter in bowl w/ rubber spatula until smooth. Add sugar.
2. Beat well. Add egg yolk; mix well.
3. Sift in flour in 2 parts, mixing each addition w/ rubber spatula until now powder remains before adding next.
4. Shape into ball w/ hands.
5. Pound into flat circle, wrap in plastic wrap, & freeze just over 2 hours.
6. Cover flat surface w/ flour. Unwrap dough, keeping plastic wrap on bottom, & roll out to 5 mm thickness.
7. Keeping plastic wrap on bottom, mold dough to fit tart baking dish. Cut excess off edges.
8. Remove dough from dish & gently roll edges flat.
9. Place crust back into dish, reshaping edges w/ fingers. Poke holes into bottom w/ fork.
10. Cover crust w/ foil & fill w/ baking beans. Bake at 170C (338F) for 15 minutes. Remove foil & beans; bake crust 10-20 minutes more, or until light brown.
11. Leaving in baking dish, cool on wire rack.
Custard cream:
2 medium egg yolks
50g (1 3/4 oz.) sugar
20g (7/10 oz.) pastry flour, sifted
180mL (3/4 cup) milk
Vanilla oil
15g (1/2 oz.) unsalted butter, room temperature
12. Beat yolks & sugar in bowl until pale.
13. Add flour & quickly whisk in.
14. Heat milk in pot over medium heat until simmering.
15. Add to egg mixture & mix.
16. Pour through sieve back into pot. Mix w/ rubber spatula over medium heat.
17. Once thick, reduce heat to low & continue mixing from bottom w/ rubber spatula until smooth & no clumps remain. Once all together & glossy, turn off heat.
18. Mix in vanilla & butter. Transfer to leftover dish. Cover surface of cream tightly w/ plastic wrap, cool to room temperature atop ice, & cool in refrigerator.
19. Place tart crust on can or other tall surface & remove sides of dish.
20. Before using custard, mix w/ rubber spatula until smooth. Spoon into crust, spreading out evenly.
Decoration:
100 mL (2/5 cup) heavy cream
½ tbsp. sugar
18 grapes
12 strawberries
12 blueberries
50g (1 3/4 oz.) apricot jam
Silver dragees
1 chocolate icing pen
21. Whip cream & sugar in bowl atop ice water until soft peaks form. Spread on top of custard w/ rubber spatula.
22. Line edges of cream w/ ring of grapes. Line inside w/ ring of strawberries, then that w/ ring of blueberries.
23. Add strained apricot jam & some hot water to pot & heat. Use to glaze fruits w/ pastry brush.
24. Warm cake knife in warm water & cut tart into 6 slices. Warm icing pen & cut off tip. Pipe hedgehog’s eyes, nose, & mouth onto tip of each slice. Finish w/ dragees.
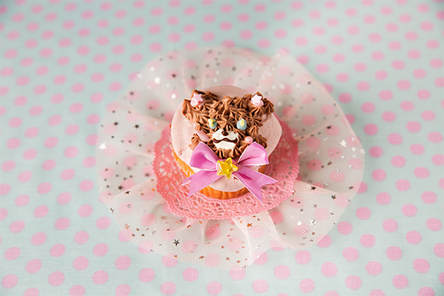
Kangaroo Cupcakes (makes 6 cupcakes)
Cupcakes:
60g (2.1 oz) unsalted butter, room temperature
80g (2 4/5 oz) sugar
1 pinch salt
1 medium egg, beaten, room temperature
120g (4 1/4 oz) pastry flour
1 tsp. baking powder
70 mL (1/3 cup) milk, room temperature
1. Place butter & bowl & mix w/ rubber spatula until smooth. Add sugar & salt; beat w/ hand mixer until pale.
2. Add egg a little at a time.
3. Sift in half of flour & baking powder; mix. Add half of milk & mix w/ rubber spatula until smooth.
4. Sift in remaining dry mixture, then mix in remaining milk.
5. Scoop batter into lined muffin tins ¾ full. Bake at 170C (338F) for 25-30 minutes. Remove cupcakes from tins & cool on wire rack.
Buttercream:
100g (3 1/2 oz) egg whites, room temperature
130g (4 3/5 oz) powdered sugar
200g (7 oz) unsalted butter, room temperature
4 tsp. cocoa powder
3 tbsp. mango powder
6. Gently beat egg whites & sugar in bowl.
7. Bring water to boil in frying pan. Hold bowl over water to form double boiler, beating about 60 seconds.
8. Remove from boiler & beat w/ hand mixer about 5 minutes, or until stiff, glossy peaks form.
9. Mix softened butter w/ spoon. Add about 2-3 tbsp. to meringue at a time & mix well w/ hand mixer.
10. Transfer ¼ of cream to separate bowl & mix in cocoa w/ spoon.
11. Mix mango powder into remaining cream w/ rubber spatula.
12. Transfer mango cream into piping bag w/ thick round tip. Pipe onto cupcakes in spiral pattern.
13. Transfer cocoa cream into piping bag w/ thin round tip. Pipe a big & small kangaroo head, arm, & tail onto each cupcake.
14. Press faces flat w/ wet finger. Draw designs on face, ears, & arms w/ wet skewer.
Decorations:
Chocolate icing pen
Sugar balls
15. Warm chocolate pen in hot water & cut off tips. Draw eyes & noses onto kangaroos.
16. Decorate mango cream w/ sugar balls.
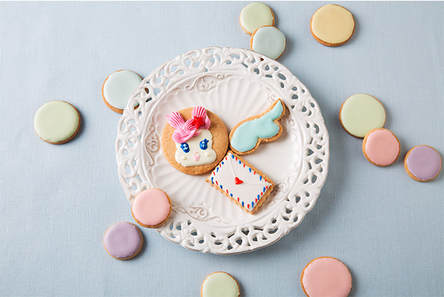
Kirarin Cookies
Cookies:
100g (3 1/2 oz.) unsalted butter, room temperature
80g (2 4/5 oz.) powdered sugar
1 medium egg yolk
200g (7 oz.) pastry flour, sifted
1. Knead butter in bowl w/ rubber spatula until smooth. Add powdered sugar.
2. Beat well. Add egg yolk; mix well.
3. Sift in flour in two parts, mixing each addition w/ rubber spatula until no powder remains before adding next.
4. Form into ball w/ hands.
5. Divide into three flat pieces, cover each in plastic wrap, & refrigerate just over 2 hours.
6. Cover flat surface w/ flour. Unwrap plastic wrap from dough pieces & roll each out to 5 mm thickness.
7. Cut out rabbit shapes w/ cookie cutters & cut away excess dough w/ knife. Re-roll out extra dough & cut. Repeat until all dough is used.
8. Line up cookies on parchment-lined baking sheet. Bake at 170C (338F) for 15-20 minutes. Remove paper from sheet & cool on wire rack.
Icing:
250g (8 4/5 oz.) powdered sugar
40g (1 2/5 oz.) egg white
Food coloring
9. Mix egg white & sugar in bowl w/ rubber spatula.
10. Beat w/ hand mixer about 5 minutes, or until peaks form.
11. Split icing in half; split 1 half in half further. Add food coloring to each a little at a time until desired color is achieved. Label colored icing as ‘for piping’, then portion uncolored icing as ‘stiff’ & ‘soft.’
12. Leave colored piping icing as is. Transfer pink icing to piping bag w/ star tip.
13. For stiff icing, mix in a few drops water. Icing should drip off slowly when spooned upwards.
14. Spoon stiff icing into prepared cornet & seal shut w/ tape. This will be used for hemming and designs.
15. For soft icing, mix in a little water at a time. Icing should be smooth & drip off quickly when spooned upwards.
16. To ice cookies, draw out edges of shape w/ stiff icing, then fill in w/ soft icing.
17. For Kirarin cookies, draw out Kirarin’s face in stiff pale yellow. Fill in w/ soft icing in same color, spreading out w/ small spoon. Let harden.
18. Pipe pink dollops atop Kirarin’s head for ears.
19. Add tuft of hair & top w/ sprinkle, candy, or other decoration.
20. Draw Kirarin’s blue eyes.
21. Draw Kirarin’s pink nose & mouth, & pale yellow cheeks. Let dry.
22. Once completely dry, add white highlights to eyes.
23. Let cookies harden about 1 day.
Lion Ice Cream (makes 4-5 servings)
Vanilla ice cream:
1 medium egg yolk
80 mL (1/3 cup) milk
45g (1 3/5 oz.) sugar
Vanilla essence
100 mL (3/5 cup) heavy cream
(if short on time, you can substitute store-bought vanilla ice cream)
1. Mix yolk & sugar in bowl.
2. Pour milk into pot & heat to just before boiling point.
3. Mix heated milk into egg mixture a little at a time. Pass through sieve & return to pot.
4. Mix well from bottom of pot over low heat until slightly thick. Remove from heat & add vanilla.
5. Chill in bowl of ice water. Once room temperature, freeze.
6. Place heavy cream in bowl & immerse bottom in ice water. Whip to soft peaks.
7. Add to egg mixture & mix well. Cover bowl in plastic wrap & freeze2-3 hours.
8. Mix well w/ hand mixer & freeze again. Repeat 2-3 times. Once smooth, refrigerate to firm up.
Blue Hawaii gelato:
5g (1/5 oz.) gelatin powder
2 tbsp. water
180 mL (3/4 cup) carbonated water
2-3 tbsp. lemon juice
2 tbsp. sugar
Blue snowcone syrup
9. Pour water into small container & sprinkle in gelatin powder. Heat over double boiler until powder is dissolved.
10. Mix carbonated water, juice, sugar, & syrup gently in separate container.
11. Add 1-2 tbsp. syrup mixture to gelatin mixture to thin out. Add gelatin mixture back into syrup mixture.
12. Freeze 2-3 hours. Smash clumps w/ fork until smooth. Once smooth, freeze again.
13. Let ice cream & gelato soften slightly at room temperature, then stir until smooth. Mix 2-3 tbsp. gelato into 2/3 of ice cream. You want to create a nice marble effect; don’t overmix. Freeze again to firm up.
Toppings:
100 mL (3/5 cup) heavy cream
2 tsp. sugar
Blue chocolate icing pen
Brown chocolate icing pen
8-10 almonds
14. Pour cream & sugar into bowl & immerse bottom in ice water. Whip to soft peaks.
15. Arrange scoop of marble ice cream on serving dish. Pipe cream on top w/ star tip in radial pattern.
16. Fill center of circle w/ cream.
17. Top cream center w/ small ball vanilla ice cream. Add 2 almonds for ears.
18. Warm up icing pens. Draw on eyes, nose, & tail.
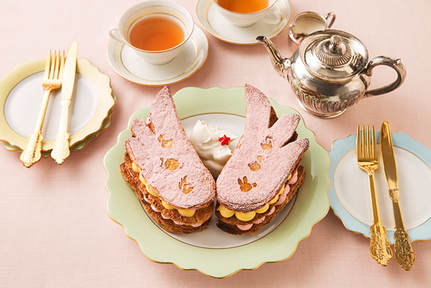
Memoire Millefeuille
Crust:
3 sheets frozen pie crust (18 x 18 cm)
Powdered sugar
1. Cut crust sheets in half. Draw wing shape w/ bamboo skewer. Cut out w/ kitchen scissors, clipping gaps twice.
2. Place on chilled parchment-lined baking sheets & stretch out “feathers.” Make 2 top layers, 2 center layers, & 2 bottom layers, making for 6 wings total.
3. Bake at 200C (392F) for 10 minutes, or until all puffed up. Cover w/ another sheet parchment, then another baking sheet on top of that. Press down tightly w/ oven mitted hands & flatten out crust. Bake 10 minutes more.
4. Remove estra baking sheet. Cover entire crust w/ powdered sugar. Bake at 230C (446F) for 3-5 minutes to caramlize surface.
5. Once finished, cool on wire rack.
Custard cream:
1 medium egg yolk
25g (4/5 oz.) sugar
10g (1/3 oz.) pastry flour
90 mL (2/5 cup) milk
Vanilla oil
5g (4/25 oz.) unsalted butter, room temperature
6. Beat yolk & sugar in bowl until pale.
7. Quickly beat in flour.
8. Heat milk in pot over medium heat until surface is bubbling.
9. Slowly add hot milk to yolk mixture, stirring simultaneously.
10. Pass through sieve back into pot. Mix w/ rubber spatula over medium heat.
11. When thick, reduce heat to low & continue mixing from bottom w/ rubber spatula until no lumps remain. One cream comes together & is glossy, remove from heat.
12. Mix in vanilla & butter. Transfer to leftover container. Cover surface of cream tightly w/ plastic wrap & cool in ice water, then chill in refrigerator.
Raspberry buttercream:
50g (1¾ oz.) egg white
65g (2 2/3 oz.) powdered sugar
100g (3½ oz.) unsalted butter, room temperature
1-2 tbsp. raspberry puree
13. Gently beat egg white & sugar in bowl.
14. Bring hot water to boil in frying pan. Hold bowl about water to create double boiler for about 60 seconds, continuing to beat mixture.
15. Remove from heat & whip vigorously w/ electric hand mixer for 5 minutes, or until stiff, glossy peaks form.
16. Stir softened butter w/ spoon. Add 1-2 tbsp. to cream at a time & mix well w/ hand mixer.
17. Add a little raspberry puree at a time; mix w/ hand mixer.
18. Place crust pieces on cutting board. Transfer raspberry buttercream to piping bag w/ thick round tip. Pipe dollops on entire surface of 1 pair wings. Top w/ another pair wings.
19. Place custard cream in bowl & stir w/ rubber spatula until smooth. Transfer to piping back w/ thick round tip. Pipe dollops onto middle wing layers.
Decoration:
Powdered sugar
Strawberry powder
50 mL (1/5 cup) heavy cream
1 tsp. sugar
20. Mix strawberry & powdered sugar in bowl w/ spoon until pink color is achieved.
21. Place top crust pieces onto cutting board & line animal shapes on surface.
22. Sift strawberry sugar over tops of crust pieces.
23. Place partially assembled millefeuille onto serving platter next to each other. Carefully remove pattern pieces from top pieces & top millefeuilles.
24. Whip cream & sugar in bowl atop ice water until soft peaks form. Spoon whipped cream in between wings, forming a pegasus’ tail.
Mofflun Sakura Muffins
Muffin:
1 medium egg, room temperature
80g (2 4/5 oz.) light brown sugar
60g (2.1 oz.) vegetable oil (about 70 mL)
50g (1¾ oz.) plain yogurt
50 mL (1/5 cup) milk
120g (4¼ oz.) pastry flour
1 tsp. baking powder
1. Crack egg into bowl & beat. Mix in sugar. Mix in a little oil at a time.
2. Mix in yogurt & milk until smooth. Sift in flour & baking powder; beat.
3. Pour into lined muffin tins. Bake at 170C (338F) for 20-25 minutes. Remove muffins from tins & cool on wire rack.
Ganache:
100 mL heavy cream
25g (4/5 oz.) chocolate bar, finely chopped
4. Bring cream to boil in small pot.
5. Once boiling, remove from heat. Add chocolate & stir w/ rubber spatula until melted. If not melting, return over low heat & stir until melted.
6. Once cool enough to handle, transfer to separate container & chill in refrigerator.
Strawberry cream:
100 mL (2/5 cup) heavy cream
½ tbsp. sugar
1 tbsp. strawberry powder
7. Beat sugar & strawberry powder in bowl. Mix in 2 tsp. hot water.
8. Mix in a little cream at a time atop ice water until soft peaks form.
9. Spoon strawberry cream onto tops of muffins.
10. Place ganache in separate bowl & beat atop ice water until soft peaks form.
11. Transfer ganache to piping bag w/ star tip.
12. Carve outlines of Mofflun heads into cupcake frosting. Fill in outlines w/ dollops of ganache. Form muzzles w/ extra strawberry cream.
Decoration:
Pink icing pen
Blue icing pen
Chocolate icing pen
Yellow icing pen
13. Warm icing pens in hot water & cut off tips. Draw in pinks of Mofflun’s ears & cheeks, blue & yellow eyes, & brown nose & mouth.
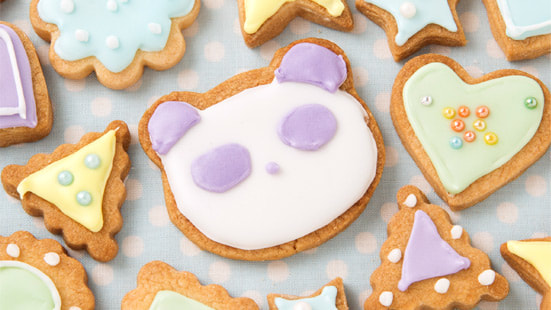
Panda Cookies (makes about 30 cookies)
Cookies:
100g (3½ oz.) unsalted butter , room temperature
80g (2 4/5 oz.) powdered sugar
1 medium egg yolk
200g (7 oz.) pastry flour, sifted
1. Knead butter in bowl w/ rubber spatula until smooth. Add powdered sugar.
2. Beat well. Add egg yolk; mix well.
3. Sift in flour in two parts, mixing each addition w/ rubber spatula until no powder remains before adding next.
4. Form into ball w/ hands.
5. Divide into three flat pieces, cover each in plastic wrap, & refrigerate just over 2 hours.
6. Cover flat surface w/ flour. Unwrap plastic wrap from dough pieces & roll each out to 5 mm thickness.
7. Cut out panda shapes w/ cookie cutters & cut away excess dough w/ knife. Re-roll out extra dough & cut. Repeat until all dough is used.
8. Line up cookies on parchment-lined baking sheet. Bake at 170C (338F) for 15-20 minutes. Remove paper from sheet & cool on wire rack.
Decoration:
240g (8½ oz.) powdered sugar
40g (1 2/5 oz.) egg white
Food coloring
Silver dragees
Sanding sugar
9. Mix egg white & sugar in bowl w/ rubber spatula.
10. Beat w/ hand mixer about 5 minutes, or until peaks form.
11. Spoon out icing into 3 small containers & mix food coloring into each a little at a time w/ bamboo skewer until desired colors are achieved.
12. Split each color in half. Label 1 ‘stiff’ and the other ‘soft.’
13. For stiff icing, mix in a few drops water. Icing should drip off slowly when spooned upwards.
14. Spoon stiff icing into prepared cornet & seal shut w/ tape. This will be used for hemming and designs.
15. For soft icing, mix in a little water at a time. Icing should be smooth & drip off quickly when spooned upwards.
16. To ice cookies, draw out edges of shape w/ stiff icing, then fill in w/ soft icing.
17. Decorate w/ dragees & colored sugar as desired. Let harden.
18. For panda cookies, draw out edges w/ stiff white icing, then fill in w/ white soft icing, spreading out w/ small spoon.
19. Let base harden.
20. Pipe on edges of ears, eyes, & nose w/ pale purple stiff icing. Fill in w/ soft icing.
21. Let cookies harden about 1 day.
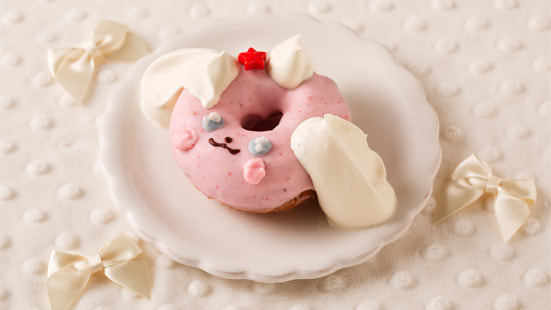
Pecorin Doughnuts (makes 8 doughnuts)
Doughnut:
40g (1 2/5 oz.) unsalted butter, room temperature
70g (2½ oz.) sugar, sifted
1 egg, beaten, room temperature
3 tbsp. milk, room temperature
1 pinch salt
200g (7 oz.) pastry flour
2 tsp. baking powder
Frying oil
(if short on time, you can substitute store-bought doughnuts)
1. Knead butter in bowl until smooth.
2. Mix in sugar, then half of egg. Whisk in milk & salt.
3. Press flour & baking powder through sieve, then mix w/ rubber spatula until sugar is no longer visible.
4. Once dough comes together, wrap bowl in plastic wrap & refrigerate just over 1 hour.
5. Cover cutting board w/ flour. Cut dough into eight portions.
6. Stretch out each portion & shape into ring, molding ends together.
7. Heat oil to 170C (338F). Fry doughnuts 3-4 minutes per side, or until lightly browned. Remove from oil & cool on wire rack.
Decoration:
150g (5 1/3 oz.) strawberry coating chocolate, finely chopped
Blue icing pen
Pink icing pen
White icing pen
Chocolate icing pen
100 mL (2/5 oz.) heavy cream
2 tsp. sugar
8. Melt coating chocolate over double boiler.
9. Dip one side of each doughnut into coating chocolate twice. Let harden.
10. Pipe blue eyes, brown nose & mouth, & pink cheeks onto each doughnut.
11. Whip cream & sugar in bowl in ice water until soft peaks form.
12. Place doughnuts on individual serving plates. Spoon cream onto each doughnut to form ears & tail.
Pecorin Mousse Cake (makes 1 [15 cm] cake)
Strawberry yogurt mousse:
about 20 ladyfinger biscuits
2 tbsp. water
5g gelatin powder
120g (4¼ oz.) strawberries
100g (3½ oz.) plain yogurt
40g (1 2/5 oz.) sugar
2 tsp. lemon juice
50 mL (1/4 cup) heavy cream
1. Trim ladyfingers into 5 cm lengths.
2. Line sides & bottom of round baking dish w/ ladyfingers.
3. Pour water into heat-resistant bowl. Sift in gelatin powder.
4. Mix strawberries, yogurt, sugar, & juice in blender or food processor.
5. Dissolve gelatin powder over double boiler. Add 2 tbsp. yogurt mixture to gelatin to water down, then add gelatin back into yogurt mixture. Mix from bottom atop ice water until thick.
6. In separate bowl, whip cream atop ice water until ribbony.
7. Mix cream into mousse well. Pour into ladyfinger crust & refrigerate at least 3 hours.
8. Set dish atop can or other tall surface & remove sides. Transfer cake to platter.
Decoration:
150 mL (2/3 cup heavy cream
1 tbsp. sugar
Red food coloring
Pink icing pen
Blue icing pen
White icing pen
Strawberry chocolate balls
1-2 strawberries
10. Whip cream & sugar in bowl atop ice water until soft peaks form.
11. Place half of cream into separate bowl. Mix in a little red food coloring at a time w/ bamboo skewer into 1 bowl until pale pink.
12. Transfer pink cream to piping bag w/ round tip. Pipe large circle in center of cake.
13. Use wet spoon to spread cream out smooth.
14. Spoon white cream onto either side of Pecorin’s face to form ears.
15. Warm icing pens in warm water & cut off tips. Pipe eyes in blue, mouth & nose in red, & cheeks in pink. Add highlights to eyes w/ white.
16. Thinly slice strawberries. Build up slices around base of Pecorin’s chin to make bowtie.
17. Transfer remaining cream to piping bag w/ star tip. Pipe a dollop for Pecorin’s hair, & two at each side of bowtie.
18. Decorate Pecorin’s hair w/ strawberry chocolate balls.
Pegasus Parfait (makes 1 serving)
Waffle:
85g (3 oz.) pastry flour
1 tsp. baking powder
25g (.9 oz.) sugar
Salt
1 medium egg
100 mL (2/5 cup) milk
2 tbsp. vegetable oil
1. Whisk flour, sugar, salt, & baking powder in bowl.
2. In separate bowl, crack egg & whisk in milk & oil.
3. Add wet mixture to dry mixture a little at a time, mixing until smooth.
4. Ladle thin layer of batter into waffle iron.
5. Cook waffles according to iron instructions. Remove w/ chopsticks. Cool & cut in half.
Decoration:
Vanilla ice cream
Heavy cream
Sugar
Canned pears
Melon slices
Orange wedges
Strawberries
Pink icing pen
Purple icing pen
Blue icing pen
Yellow icing pen
Chocolate icing pen
Jam
6. Warm icing pens in hot water & cut off tips. Color waffle half w/ pink, purple, blue, & yellow stripes.
7. Whip cream & sugar in bowl atop ice water until soft peaks form. Spoon into piping bag w/ star tip.
8. Scoop ice cream into glass dish. Pipe cream on top.
9. Form pegasus’ head & mane w/ pear & melon pieces. Decorate w/ orange wedges & strawberries.
10. Place waffle to side of ice cream to be wings. Spoon jam into piping bag, cut off tip, & pipe edges of waffle.
11. Pipe star dollops around neck of pegasus. Paint on eyes & nostrils w/ chocolate icing.
Penguin Snowcone (makes 1 serving)
200 mL (4/5 cup) water
3 tbsp. sugar
Blue snowcone syrup
Vanilla ice cream
Candied chestnut
Chocolate icing pen
White icing pen
1. Mix water & sugar. Transfer to container & freeze to harden.
2. Pour syrup into small container.
3. Chop up ice w/ snowcone maker. Pack tightly into syrup bowl w/ hands. Round out.
4. Spoon out a little extra ice & flatten w/ hands. Attach to left side of penguin. Do the same for right side.
5. Pour syrup atop penguin’s head w/ spoon until entire body is colored.
6. Scoop out vanilla ice cream w/ spoon & attach to front of penguin to make belly.
7. Attach 1 candied chestnut to form beak. Warm chocolate pens in hot water & cut off tops. Draw brown eyes w/ white highlights.
Polar Bear Buche de Noel
Sponge sheet cake (makes 1 (27 x 27 cm) cake):
4 medium eggs
85g sugar
2 tbsp. milk
60g pastry flour
1. Lightly mix eggs & sugar in bowl w/ hand mixer.
2. Heat water to about 50C in frying pan to make double boiler. Continue mixing batter over double boiler. When about 36C, remove from boiler.
3. Whip vigorously until slowly falling, overlapping ribbons from when whisk is lifted from batter.
4. Add milk & mix well w/ whisk. Sift flour & add all at once to batter. Beat well.
5. Pour out onto sheet pan & spread out w/ rubber spatula.
6. Gently drop from height of 10-20 cm to get rid of air bubbles.
7. Bake at 190C about 12 minutes. Center of cake should spring back when pressed.
8. Carefully flip out onto wire rack covered w/ parchment paper.
9. Carefully remove parchment; first from the corners, then the face. Wrap paper in cloth & chill so it won’t dry out.
Ganache:
400 mL heavy cream
100g dark chocolate, finely chopped
10. Heat cream in pot.
11. Just before boiling point, remove from heat & add chocolate. Stir w/ rubber spatula to melt. If not melting, mix while placed over low heat.
12. Once warm, chill well in refrigerator.
13. Transfer chilled cream to mixing bowl & place bowl in larger bowl filled w/ ice water. Whip until soft peaks form. Divide in half & refrigerate one half.
14. Whip remaining half in ice water until medium peaks form.
15. Place paper vertically on surface. Once cloth is slightly warm, place cake on top so golden side is facing upwards.
16. Spread cloth uniformly w/ ganache cream w/ rubber spatula, leaving 2 cm border.
17. Grasp edges of paper & use as support to carefully wrap cake into roll.
18. Place ruler at top of paper & slide while pulling other side of bottom of paper to adjust.
19. Roll both ends of paper to seal shut. Refrigerate at least 2 hours, preferably overnight.
20. Unwrap cake. Cut off ends w/ knife warmed in hot water. Should be two 3 cm spiral slices.
21. Frost sides of each slice w/ reserved ganache. Add bark-like pattern to ganache w/ fork. Chill.
22. Transfer large cake piece to plate & frost surface w/ remaining ganache. Texture like before.
Decoration:
100 mL heavy cream
1½ tbsp. sugar
1 strawberry
1 canned cherry
1 mint leaf
1 chocolate icing pen
23. Whip cream & sugar in bowl in ice water until soft peaks form.
24. Spoon 2/3 of whipped cream onto whole roll cake. Transfer remaining cream to piping bag w/ thick round tip. Pipe polar bear’s body & head. Cut off tip of strawberry & place on top of head for hat.
25. Transfer cream to piping bag w/ thin round tip. Pipe bear’s ears, paws, muzzle, & hat poof.
26. Heat icing in warm water & cut off tip. Pipe on bear’s eyes & nose. Place cherry in between both paws. Decorate w/ mint leaf.
27. Place one of remaining slices on top of cake. Transfer cream to piping bag w/ star tip. Pipe around perimeter of slice.
Poodle Chocolate Cake (makes 1 [12 cm] cake)
Chocolate sponge cake:
1 medium egg (about 75g / 2 3/5 oz.), room temperature
45g (1 2/3 oz.) sugar, sifted
1 tbsp. milk
35g (1 1/4 oz.) pastry flour
1 tsp. cocoa
(if short on time, you can substitute store-bought chocolate sponge cake)
1. Beat egg in bowl. Add sugar & mix gently w/ hand mixer.
2. Pour water into frying pan & heat to about 50C (122F), or until simmering. Hold bowl over water to form double boiler & continue beating w/ hand mixer. Remove from boiler when 36C (97F).
3. Quickly beat w/ hand mixer until slow ribbons form when whisk is lifted upwards.
4. Add milk & whisk well.
5. Sift in sugar in two parts, folding in well w/ rubber spatula before adding next addition.
6. Gently pour into parchment-lined baking dishh. Gently drop from 10-20 cm height w/ both hands to get rid of air bubbles.
7. Bake at 170C (338F) about 20 minutes. Center should spring back when pressed. Pull out of dish by edges of paper & cool on wire rack. When cool enough to handle, remove paper, wrap in plastic wrap, & refrigerate until ready to use.
Ganache:
300 mL (1 1/4 cup) heavy cream
75g (2 3/5 oz.) dark chocolate bar, finely chopped
(if short on time, you can substitute store-bought ganache)
8. Heat cream in pot.
9. Once boiling, turn off heat. Add chocolate & stir w/ rubber spatula until melted.
10. When cool enough to handle, pour into separate container & refrigerate.
11. Cut cake into 3 equal slices horizontally.
12. Cut round edges off 1 slice to form muzzle. Trim edges & stack together to form ears.
13. Whip chilled ganache atop ice water until soft peaks form.
14. Spread ganache onto whole sponge cake layer & top w/ another cake layer.
15. Spread ganache onto muzzle piece & stick ganache side down onto bottom end of cake. Attach ears in similar fashion.
16. Transfer remaining ganache into piping bag w/ star tip. Pipe dollops all over cake, leaving ears bare for now.
17. Switch to flat tip & pipe wave pattern over ears.
Toppings:
3 chocolate bites
Chocolate icing pen
Pink icing pen
1 strawberry
18. Stick on 3 chocolate bites to be eyes & nose.
19. Warm icing pens & cut off tips. Draw mouth w/ chocolate & tongue w/ pink.
20. Pipe paws on either bottom end of muzzle w/ star tip. Glue strawberry between both paws in center.
Rabbit Cookies (makes about 30 cookies)
Cookies:
100g (3 1/2 oz.) unsalted butter, room temperature
80g (2 4/5 oz.) powdered sugar
1 medium egg yolk
200g (7 oz.) pastry flour, sifted
1. Knead butter in bowl w/ rubber spatula until smooth. Add powdered sugar.
2. Beat well. Add egg yolk; mix well.
3. Sift in flour in two parts, mixing each addition w/ rubber spatula until no powder remains before adding next.
4. Form into ball w/ hands.
5. Divide into three flat pieces, cover each in plastic wrap, & refrigerate just over 2 hours.
6. Cover flat surface w/ flour. Unwrap plastic wrap from dough pieces & roll each out to 5 mm thickness.
7. Cut out rabbit shapes w/ cookie cutters & cut away excess dough w/ knife. Re-roll out extra dough & cut. Repeat until all dough is used.
8. Line up cookies on parchment-lined baking sheet. Bake at 170C (338F) for 15-20 minutes. Remove paper from sheet & cool on wire rack.
Decoration:
240g (8 1/2 oz.) powdered sugar
40g (1 2/5 oz.) egg white
Food coloring
Chocolate icing pen
Silver dragees
Sanding sugar
9. Mix egg white & sugar in bowl w/ rubber spatula.
10. Beat w/ hand mixer about 5 minutes, or until peaks form.
11. Spoon out icing into 3 small containers & mix food coloring into each a little at a time w/ bamboo skewer until desired colors are achieved.
12. Split each color in half. Label 1 ‘stiff’ and the other ‘soft.’
13. For stiff icing, mix in a few drops water. Icing should drip off slowly when spooned upwards.
14. Spoon stiff icing into prepared cornet & seal shut w/ tape. This will be used for hemming and designs.
15. For soft icing, mix in a little water at a time. Icing should be smooth & drip off quickly when spooned upwards.
16. To ice cookies, draw out edges of shape w/ stiff icing, then fill in w/ soft icing.
17. Decorate w/ dragees & colored sugar as desired. Let harden.
18. For rabbit cookies, draw out edges w/ stiff white icing, then fill in w/ white soft icing, spreading out w/ small spoon.
19. Let base harden.
20. Pipe on edges of ears, eyes, & nose w/ pink stiff icing. Fill in w/ soft icing.
21. Let ears harden.
22. Pipe on bow w/ red icing.
23. Pipe on eyes & nose w/ chocolate icing.
24. Let cookies harden about 1 day.
Rabbit Heart Cake (makes 1 cake - lower layer 18 cm, upper layer 12 cm)
Sponge cake lower layer (can also substitute store-bought sponge cake):
3 medium eggs, room temperature
90g sugar
1 tbsp. milk
180g pastry flour, sifted
30g unsalted butter, melted
1. Lightly beat eggs & sugar w/ hand mixer.
2. Fill frying pan w/ water & heat to about 50C, or until simmering. Hold bowl over water to form double boiler & continue mixing w/ hand mixer until about 36C.
3. Remove from heat & beat vigorously w/ hand mixer until thick ribbons form.
4. Add milk & mix well. Sift in half of flour & gently mix w/ rubber spatula until no flour is visible.
5. Sift in remaining flour & fold in vigorously w/ rubber spatula from bottom of bowl.
6. Add butter, pouring down spatula surface into bowl in spiral. Mix well from bottom of bowl.
7. Pour into 18 cm parchment-lined baking dish. Lightly drop from height of 10-20 cm to get rid of air bubbles. Bake at 170C for 20-25 minutes. Center should spring back when pressed. Pull at edges of parchment to remove from dish; set on wire rack to cool.
Sponge cake upper layer (can also substitute store-bought sponge cake):
1 medium egg, room temperature
30g sugar
1 tsp. milk
60g pastry flour, sifted
10g unsalted butter, melted
8. Repeat process used for lower layer.
9. Pour into 12 cm parchment lined baking dish. Lightly drop from height of 10-20 cm to get rid of air bubbles. Bake at 170C about 20 minutes. Center should spring back when pressed. Pull at edges of parchment to remove from dish; set on wire rack to cool.
10. Once both layers are finished, remove parchment from both. Slice lower layer horizontally into three layers.
11. Slice upper layer horizontally into 2 layers. Pick out 20 strawberries to use for decoration & cut out tops.
Raspberry cream:
600 mL heavy cream
6 tbsp. sugar
150 mL raspberry puree
12. Add cream & sugar to bowl. Set bowl in ice water & whip until soft peaks form. Set aside about 100g cream & refrigerate the rest.
13. Add raspberry puree to remaining cream & whip until soft peaks form.
Decoration:
2 packs (about 600g) strawberries
1 chocolate icing pen
14. Set 1 lower cake layer onto revolving cake stand. Lightly cover top w/ raspberry cream & top w/ strawberry slices in spiral pattern. Cover strawberries w/ more cream. Top w/ 2nd lower layer & repeat process. Top w/ 3rd lower layer.
15. Cover sides w/ raspberry cream using palate knife. Spin revolving stand as you go to make easier.
16. Cover top w/ plenty of raspberry cream & spread out w/ palate knife.
17. Trim edges of top frosting, spinning to get nice and even.
18. Use back of spoon to engrave strips into side icing.
19. Take 1 upper cake layer; frost & top w/ strawberries in same fashion. Top w/ other upper layer.
20. Cover top & sides w/ plenty of cream & smooth out.
21. Engrave sides of upper layer. Carefully place onto center of lower cake.
22. Draw out design on top of cake w/ skewer. Spoon remaining raspberry cream into piping bag w/ star tip. Pipe dollops into rabbit shape.
23. Fill separate piping bag w/ star tip w/ plain cream. Pipe dollops into heart around rabbit. Pipe border of raspberry dollops around heart.
24. Surround upper layer w/ reserved strawberries. Pipe border of raspberry cream around lower layer of cake.
25. Warm icing pen in warm water & cut off tip. Add rabbit’s eyes & nose.
Rabbit Shortcake (makes 1 [15 cm] cake)
Sponge cake:
2 medium eggs
60 g (about 2 1/5 oz.) sugar
2 tsp. milk
60 g (about 2 1/5 oz.) pastry flour
20 g (about 7/10 oz.) butter, melted
1. Lightly mix eggs & flour in bowl w/ hand mixer.
2. Fill frying pan w/ water & heat to about 50C (122F), or simmering. Beat batter over water until about 36C (96.8F).
3. Continue to beat until ribbony when whisk is lifted from batter.
4. Add milk; mix well. Sift in half of flour & mix w/ rubber spatula until no specks of flour remain.
5. Sift in remaining flour & mix, making sure to scrape bottom of bowl.
6. Mix in melted butter, making sure to scrape bottom of bowl.
7. Pour into cake pan to come 10-20 cm up sides, removing any air bubbles.
8. Bake at 170C (338F) for 20-25 minutes, or until center is cooked through. Turn out onto parchment-lined cooling rack to cool.
Decoration:
200 mL (about 4/5 cup) heavy cream
1½ tbsp. granulated sugar
1 package strawberries (about 300 g)
Chocolate writing icing - brown, pink
Favorite jam
9. Remove paper & cut cake in half horizontally. Tip: Insert skewers or toothpicks before cutting to mark where to slice.
10. Mix sugar, cream, & ice water in bowl until soft peaks form. Reserve 1/3 of whipped cream in refrigerator.
11. Whip remaining cream until stiff peaks form. Pour reserved cream into piping bag w/ star tip.
12. Place bottom layer of sponge cake on plate & pipe cream on top.
13. Top cream w/ strawberries. If strawberries are very large, slice in half.
14. Place second layer of cake on top. Save remaining piping cream in refrigerator.
15. Top surface generously w/ refrigerated soft cream.
16. Pipe rabbit design on top of cake. Tip: Draw out design w/ skewer for easy reference.
17. With chocolate icing, pipe out centers of ears in pink, eyes & nose in brown.
18. Pipe bow w/ jam.
19. Add additional pipettes of cream w/ round tipped piping bag. Decorate w/ additional strawberries.
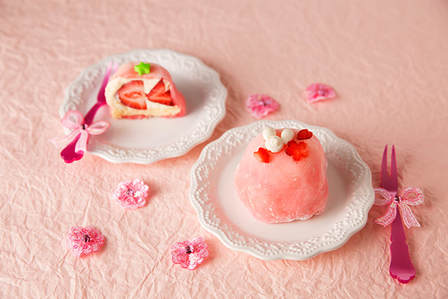
Sakura Cake Daifuku
Sponge cake (makes 1 [12 cm] cake):
1 medium egg, room temperature
30g (1 oz.) sugar
1 tsp. milk
30g (1 oz.) pastry flour, sifted
10g (1/3 oz.) melted butter
1. Mix egg & sugar in bowl w/ electric hand mixer.
2. Heat water in frying pan to about 50C (122F), or until simmering. Hold bowl over water to create double boiler. Continue mixing until mixture is about 36C (97F), then remove from heat.
3. Mix well until slow ribbons form when whisk is lifted.
4. Add milk & mix well. Sift in half of flour & quickly mix w/ rubber spatula until no powder is visible.
5. Sift in remaining flour & fold in well from bottom w/ rubber spatula.
6. Stir in butter w/ rubber spatula.
7. Pour into parchment-lined baking dish. Gently drop from 10-20 cm height to get rid of air bubbles.
8. Bake at 170C (338F) for 15-20 minutes. Center should spring back when pressed. Remove by edges of paper & cool on wire rack.
9. Cut cake into 1 cm horizontal layers. Cut out 6 circles w/ 6 cm circle cookie cutter.
Decoration:
200 mL (4/5 cup) heavy cream
1 tbsp. sugar
12 strawberries
10. Cut tops off strawberries and cut six in half lengthwise. Cut tips to look like goldfish tails. Cut small, thin pieces into flower petals.
11. Whip cream & sugar in bowl atop ice water until soft peaks form. Refrigerate until ready to use.
Daifuku (gyuuhi):
100g (3½ oz.) refined rice flour
200 mL (4/5 cup) water
80g (2 4/5 oz.) sugar
Red food coloring
Katakuriko (can substitute potato starch)
12. Pour flour into heat-resistant bowl. Add a little water at a time, mixing so no clumps remain w/ each addition. Once smooth & all water is added, mix in sugar.
13. Mix food coloring w/ small amount of water. Add to dough w/ bamboo skewer a little at a time until pink.
14. Microwave 2 minutes, then stir w/ rubber spatula, & microwave 1 minute. Repeat 2 more times. Dough is done when translucent.
15. Cover baking tray w/ plenty of starch. Transfer dough to board w/ rubber spatula & cool. When cool enough to handle, transfer to cutting board & cut into 6 portions.
16. Roll each portion out to size of container being used (e.g. 7 cm ramekins).
17. Cover containers w/ plenty of starch & press dough pieces into each one like forming pie crust.
18. Transfer whipped cream to piping bag w/ round tip. Fill inside of daifuku 1/3 full.
19. Top cream w/ 1 half strawberry & 1 tail strawberry, forming goldfish. Pipe more cream over top so strawberry pieces can’t be seen.
20. Top w/ sponge cake & wrap daifuku dough over top, sealing edges. Carefully flip daifuku out of molds & refrigerate about 30 minutes.
21. Draw bunny heads on top of daifuku w/ remaining cream. Garnish w/ strawberry petals.
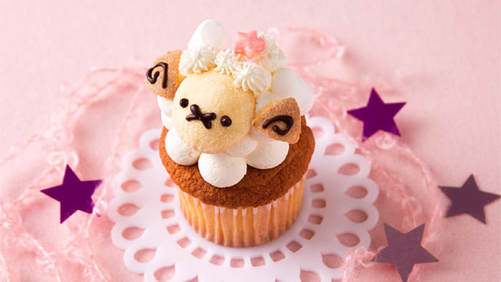
Sheep Cupcakes (makes 6-8 [7 cm] cupcakes)
Cupcakes:
2 medium eggs, room temperature
60g (2.1 oz.) sugar
2 tsp. milk
60g (2.1 oz.) pastry flour, sifted
20g (7/10 oz.) melted butter
1. Gently mix eggs & sugar in bowl w/ electric hand mixer.
2. Pour water into frying pan & turn on heat, heating to about 50C (122F), or until simmering. Hold bowl over hot water to create double boiler & continue to beat w/ mixer. When about 36C (97F), remove from boiler.
3. Whip quickly w/ hand mixer until batter drips slowly when whisk is lifted.
4. Add milk & beat well. Sift in half of flour & quickly mix in w/ rubber spatula until no powder remains.
5. Sift in remaining flour & firmly fold in from bottom w/ rubber spatula.
6. Mix in melted butter from bottom.
7. Ladle batter into lined muffin tin cups ¾ full.
8. Bake at 170C (338F) for 20-25 minutes. Centers should sprink back when pressed. Remove cupcakes from tins & cool on wire rack.
Decoration:
300 mL (1¼ oz.) heavy cream
1½ tbsp. sugar
about 30g (1 oz.) marshmallows
6-8 castella cake bells
Chocolate icing pen
9. Whip cream & sugar in bowl atop ice water until soft peaks form.
10. Spoon into piping bag w/ round tip. Pipe on top of cupcakes in round dollops. Top w/ marshmallows.
11. Cut castella bells in half. Pipe eyes & mouth onto half of these w/ icing, then cut remaining halves in half & pipe on spirals for ears.
12. Use cream to glue castella face onto front, & ears on either side of face.
13. Switch to star tip. Pipe remaining cream in dollops atop sheep’s face.
Songbird Cupcakes (makes about 6 [7 cm] cupcakes)
Cupcakes:
60g (2.1 oz) unsalted butter, room temperature
80g (2 4/5 oz) sugar
1 pinch salt
1 medium egg, beaten, room temperature
120g (4 1/4 oz) pastry flour
1 tsp. baking powder
70 mL (1/3 cup) milk, room temperature
1. Place butter & bowl & mix w/ rubber spatula until smooth. Add sugar & salt; beat w/ hand mixer until pale.
2. Add egg a little at a time.
3. Sift in half of flour & baking powder; mix. Add half of milk & mix w/ rubber spatula until smooth.
4. Sift in remaining dry mixture, then mix in remaining milk.
5. Scoop batter into lined muffin tins ¾ full. Bake at 170C (338F) for 25-30 minutes. Remove cupcakes from tins & cool on wire rack.
Buttercream:
100g (3 1/2 oz) egg whites, room temperature
130g (4 3/5 oz) powdered sugar
200g (7 oz) unsalted butter, room temperature
4 tbsp. cocoa powder
1 tsp. powdered green tea
2 tsp. hot water
Red food coloring
6. Gently beat egg whites & sugar in bowl.
7. Bring water to boil in frying pan. Hold bowl over water to form double boiler, beating about 60 seconds.
8. Remove from boiler & beat w/ hand mixer about 5 minutes, or until stiff, glossy peaks form.
9. Mix softened butter w/ spoon. Add about 2-3 tbsp. to meringue at a time & mix well w/ hand mixer.
10. Divide cream in half. Divide one half in half further, splitting into two bowls.
11. Color larger portion of cream w/ green tea powder in hot water. Mix w/ rubber spatula.
12. Color ¼ of cream w/ cocoa powder. Mix w/ rubber spatula.
13. Color remaining cream w/ red food coloring on tip of bamboo skewer until pink.
14. Frost cupcakes w/ chocolate cream.
15. Transfer green cream into piping bag w/ round tip. Pipe on top of chocolate in radial pattern.
16. Transfer pink cream into piping bag w/ drop flower tip. Decorate green w/ flowers.
Decoration
6 pink dragees
6 yellow dragees
6 blue dragees
Chocolate icing pen
Yellow icing pen
17. Warm chocolate pets in hot water & cut off tips. Give each dragee bird brown eyes & a yellow beak. Let harden.
18. Line up a bird of each color on center of each cupcake.
Squirrel Flan (makes 5 servings)
Caramel sauce:
60 g (2.12 oz.) granulated sugar
2 tsp. water
20 mL (2/3 fl. oz.) hot water
Lightly butter pudding molds.
1. Mix sugar & water in pot & shake over medium heat until sugar is melted.
2. When all dissolved & pale in color, reduce heat slightly & cook evenly, shaking pot occasionally.
3. Once changed in color, fragrant, & smoking slightly, turn off heat & add hot water. Be careful of steam.
4. Quickly mix & evenly distribute between molds. Keep refrigerated until making pudding.
Flan:
3 medium eggs
350 mL (1½ US cups) milk
80 g (2.82 oz.) sugar
Vanilla
5. Whip eggs.
6. Lightly mix milk & sugar in small pot. Warm until edges are simmering.
7. Mix w/ eggs. Add vanilla.
8. Pour through fine mesh sieve into mols. Place molds into baking tray.
9. Place tray in oven & pour in water to come about 3 cm up sides. Bake at 160C (320F) for 45-50 minutes.
10. Wrap in plastic wrap & chill 5 minutes.
11. Hold down tops of pudding & push from edges.
12. Dispense pudding upside down from molds onto plate.
Topping:
100 mL (3/5 US cup) heavy cream
1 tsp. sugar
6 canned cherries
12 almonds
Chocolate writing icing
13. Whip cream & sugar in bowl, w/ bottom immersed in ice water, until soft peaks form.
14. Transfer to piping bag w/ star tip. Decorate top & sides of pudding.
15. Warm up chocolate writing icing in hot water. Draw eyes, nose, & tail stripe.
16. Use almond halves for ears. Top w/ cherry.
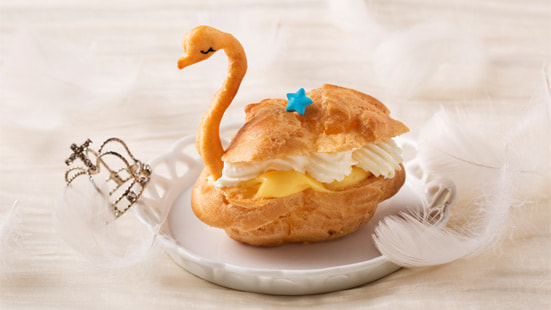
Swan Cream Puffs (makes 12 cream puffs)
Puff shell:
40g (1 2/5 oz.) unsalted butter
100 mL (3/5 cup) water
1 pinch salt
60g (2 1/10 oz.) pastry flour
about 2 medium eggs, beaten
1. Cut butter into 1 cm pieces. Place in pot w/ water & salt over medium heat.
2. Bring to boil, then add flour all at once. Immediately turn off heat & stir from bottom w/ rubber spatula.
3. Once brought together into one piece, place back over medium heat & mix w/ rubber spatula. Once a thin membrane sticks to bottom of pan, immediately turn off heat.
4. Transfer to bowl & add half of eggs. Cut in w/ wooden spatula, then knead well.
5. Add remaining egg a little at a time, mixing w/ wooden spatula.
6. Scoop large helping of dough w/ wooden spatula; should form triangle abot 10 cm as it falls off spatula.
7. Spoon some dough into piping bag w/ thin tip & pipe 14 S shapes onto baking sheet. The first bit should be a little thicker than the rest, as it’ll be the swan’s head.
8. Pipe over heads again, leaving small tips at ends for beaks.
9. Pipe remaining dough into 12 teardrop shapes w/ 1 cm round tip onto separate baking sheet.
10. Pipe extra dough onto top centers.
11. Engrave pipings slightly w/ wet fork.
12. Spray plenty of water between each puff w/ spray bottle. Bake at 200C (392F) for 10 minutes; reduce temperature to 180C (356F) & bake 10-15 minutes. Do not open oven door until everything is fully baked.
13. Bake heads at 180C for 10-15 minutes.
14. Cool puffs on wire rack.
Custard cream:
2 medium egg yolks
50g (1¾ oz.) sugar
20g (7/10 oz.) pastry flour
200 mL (5/6 cup) milk
Vanilla oil
15. Mix yolks & sugar in bowl until white.
16. Quickly mix in flour.
17. Pour milk into pot & warm over medium heat until simmering.
18. Mix warm milk into cream mixture a little at a time.
19. Sift through sieve & return to pot. Mix w/ rubber spatula over medium heat.
20. Once thick, reduce heat to low & continue mixing from bottom, heating until smooth & no clumps remain. Once all joined together & glossy, it’s done.
21. Turn off heat & mix in vanilla. Cover inside of dish w/ plastic wrap & pour in cream. Cover tightly & cool to room temperature in ice water. Freeze.
22. Before using cream, pour into bowl & mix w/ rubber spatula until smooth. Spoon into piping bag w/ star tip.
Toppings:
150 mL (5/8 cup) heavy cream
2 tsp. sugar
Blue icing pen
Chocolate icing pen
23. In separate bowl, pour cream & sugar, & immerse bottom in ice water. Whip to soft peaks, then spoon into piping bag w/ star tip.
24. Slice puff shells in half lengthwise.
25. Pipe custard cream into open part of half of shells. Top w/ whipped cream.
26. Top w/ other half of puffs.
27. Glue on swan heads w/ icing. Add eyes & decorations.
Sweets Castle (makes 1)
Cookies:
300g (10 3/5 oz.) unsalted butter, room temperature
200g (7 oz.) powdered sugar
1½ eggs, beaten
300g (10 3/5 oz.) pastry flour
300g (10 3/5 oz.) bread flour
1. Place butter in bowl & knead w/ rubber spatula until smooth. Add powdered sugar.
2. Mix well w/ whisk. Add egg a little at a time, mixing well.
3. Sift in flours in three parts, mixing well after each one until no powder is visible.
4. Knead until dough comes together.
5. Split dough into 4 portions & flatten. Wrap in plastic wrap & refrigerate at least 2 hours.
6. Unwrap dough on cutting board, keeping plastic wrap underneath. Roll out each portion to 5 mm thickness.
7. Cut out castle pieces according to templates (available on Toei and TV Asahi websites). 1 base, 2 front-back walls, 2 side walls, 2 roof pieces - 7 pieces in total. Roll out excess dough & cut out star & circle pieces.
8. Line up pieces on parchment-lined baking sheets. Bake at 170C (338F) - small cookies for 12-15 minutes, large cookies for 20-25 minutes. Cool on wire rack.
Icing:
80g (2.8 oz) egg white
480g (17 oz) powdered sugar
Food coloring - pink, yellow, cream, blue, brown
9. Mix both ingredients in large bowl w/ rubber spatula.
10. Beat w/ hand mixer about 5 minutes, or until stiff peaks form.
11. Split into 4 portions, then split 2 portions in half. Dye 1 large portion pink by adding food coloring w/ bamboo skewer a little at a time. Dye small portions yellow, cream, blue, & brown.
12. Split all colors except brown into 2 containers. Lable one half ‘stiff’ & other half ‘soft.’ All brown icing will be stiff.
13. For stiff icing, mix in a few drops water. Icing should drip off slowly when spooned upwards.
14. Spoon stiff icing into prepared cornet & seal shut w/ tape. This will be used for hemming and designs.
15. For soft icing, mix in a little water at a time. Icing should be smooth & drip off quickly when spooned upwards.
16. To ice cookies, draw out edges of shape w/ stiff icing, then fill in w/ soft icing, spreading out evenly w/ spoon.
17. Only tops of front & back pieces will be iced, w/ pink icing ‘dripping’ from the upper half.
18. Outline roof pieces twice. Roof will be white.
19. For flan pieces, draw out flans w/ cream & brown icing.
20. For marble ice cream pieces, first fill in cookies w/ blue.
21. Dot blue w/ soft white while still wet, then swirl w/ skewer for marbled effect.
22. Kirakiral stars will be white.
23. Draw white door & yellow stars onto front piece w/ stiff icing.
24. Add scalloped accents to roof pieces w/ stiff icing.
Decorations:
Wafers
3 purple macarons
Red marble chocolate
Orange marble chocolate
Green marble chocolate
Yellow marble chocolate
Chocolate bar or block
Marshmallow twist
1 freeze-dried raspberry
25. Once pieces are dry, begin constructing castle. Transfer half of white icing to piping bag & cut off tip. Place base piece on cookie plate. Form rectangle w/ wafers to make foundation of house, gluing together w/ icing.
26. Glue bottom edges of walls onto outsides of wafers. Make sure walls line up. Let dry for a while.
27. Glue roof on top. Let dry.
28. Top seam of roof w/ marshmallow twist.
29. Fit piping bag w/ fine star tip. Apply piping around marshmallow twist & side edges of roof.
30. Pipe dollops around edges of base piece.
31. Cut marshmallows in half & glue to either side of door to form pillars. Glue marshmallow, w/ bottom cut off on bias onto roof to form chimney.
32. Pipe ridges onto top of chimney. Top w/ raspberry.
33. Glue marble chocolates onto top of marshmallow twist.
34. Decorate 1 side of roof w/ flan cookies, ice cream cookies, macarons, chocolate bar pieces, red marble chocolates, & 1 kirakiral.
35. Decorate other side of roof w/ white star cookies.
White Dolphin Strawberry Daifuku (makes 6 servings)
Daifuku (gyuuhi):
100g (3½ oz.) refined rice flour
200 mL (4/5 cup) water
80g (2 4/5 oz.) sugar
Katakuriko (can substitute potato starch)
1. Add flour to heat-resistant bowl. Add a little water at a time, beating until no lumps remain before adding more.
2. Mix until smooth. Mix in sugar.
3. Heat over 600W stove for 2 minutes, mix w/ rubber spatula, and heat while mixing for 1 minute. Repeat 2 more times. Dough is finished when translucent.
4. Coat baking tray w/ plenty of starch. Transfer dough to tray w/ rubber spatula. Coat top w/ starch & chill.
Decoration:
300g (10 3/5 oz.) red bean paste (chunky or smooth, either is fine)
6 strawberries
Chocolate icing pen
5. Roll bean paste into 6 balls. Cut tops off strawberries.
6. Return dough to room temperature, split off an 80g (2 4/5 oz.) portion, wrap in plastic wrap, & split remaining dough into 6 portions.
7. Transfer portions to cutting board & flatten w/ starch-covered fingers.
8. Wrap 1 flattened dough portion around 1 bean paste ball each, sealing edges.
9. Flip daifuku over & shape into ball w/ hands.
10. Lay 1 daifuku flat in hand at a time. Brush surface w/ starch. Gently cut a horizontal slit about halfway around ball.
11. Cut through the rest of the slit, halfway into ball w/ kitchen scissors.
12. Carefully pry open dolphin mouth w/ spoon.
13. Place strawberry inside slit & gently press halves of dolphin head around it w/ hands. Repeat w/ other 5 daifuku.
14. Tear off pieces of reserved dough & cut into tail shapes w/ kitchen scissors. Carefully tear off & pieces for fins & round out w/ fingers.
15. Attach fins & tails to each dolphin; adjust shape. Warm chocolate pen & cut off tip. Draw on dolphins’ eyes.
